Add to cart product
VIEW CART
Skip to content
  • ALL PRODUCTS
    View All Swivels
    • Standard Locking Swivels
    • QD Push Button Swivels
    • Barrel Band Swivel Sets
    • Shotgun Swivel Sets
    View All Slings
    • Padded Slings
    • Tactical Slings
    • Mountaineer Slings
    • Utility Slings
    Mounts & Bases
    • Bases / Flush Cups
    • Sling Mounts
    • Adaptors
    • Bipod Mounts
    Attachments
    • Picatinny Rails
    • Muzzle Devices
    • M-LOK™
    • Keymod
    Hardware
    • Studs, Parts, Bulk
    • Hammer Extensions
    • Barrel Bands
    • Installation Tools
    SOFT GOODS
    • Wraps & Covers
    • Holsters - Hip, Chest, Concealed
    • Rifle & Shotgun Ammo Holders
    • Pistol & Other Ammo Holders
  • COLLECTIONS
    Swivels

    Hardware

    Swivels, Push Buttons, Attachments, More
    Hunter Guy

    Hunting

    Slings, Ammo Carriers, Cheek Pads, More
    Tactical Guy

    Tactical

    M-LOK, Keymod, AR-15, Mounts, Adapters, Rails, More
    Barrel Band

    Classic

    Hammer Extensions, Barrel Bands, Muzzle Loader, More
    Holster Guy

    Soft Goods

    Holsters, Ammo Holders, Cheek Pads, More

    MERCH

    Shirts, Hats, Mugs and More Coming Soon
  • WHAT'S NEW
  • CONTACT
    • FAQ
    • WHERE TO BUY
    • OUR STORY
    • DOWNLOADS
    • SHIPPING & RETURNS
GrovTec
0
  • HOME
    • View All Products
      • Standard Locking Swivels
      • QD Push Button Swivels
      • Shotgun Swivel Sets
      • Barrel Band Swivel Sets
      • Padded Slings
      • Tactical Slings
      • Backpack Slings
      • Mountaineer Slings
      • Utility Slings
      • Bases / Flush Cups
      • Sling Mounts
      • Adaptors
      • Bipod Mounts
      • Picatinny Rails
      • Muzzle Devices
      • M-LOK™
      • Keymod
      • Hammer Extensions
      • Barrel Bands
      • Tools
      • Bulk Parts
      • Rail Wraps
      • Rifle Ammo Holders
      • Shotgun Ammo Holders
      • Pistol & Other Ammo Holders
      • Cheek Pad
    • Hunting
    • Tactical
    • Hardware
    • Classic
    • Ammo Holders & Holsters
    Swivels

    Hardware

    Swivels, Push Buttons, Attachments, More
    Hunter Guy

    Hunting

    Slings, Ammo Carriers, Cheek Pads, More
    Tactical Guy

    Tactical

    M-LOK, Keymod, AR-15, Mounts, Adapters, Rails, More
    Barrel Band

    Classic

    Hammer Extensions, Barrel Bands, Muzzle Loader, More
    Holster Guy

    Soft Goods

    Holsters, Ammo Holders, Cheek Pads, More

    MERCH

    Shirts, Hats, Mugs and More Coming Soon
  • WHATS NEW
    • Contact Us
    • Where To Buy
    • FAQ
    • Our Story
    • Shipping & Returns
Account

Main menu

  • HOME
  • OUR STORY
  • PRODUCTS
  • FAQ
  • CONTACT US

Cart

Your cart is empty

Start shopping
  1. Home
  2. FAQ

FAQ

The content of the body element is displayed in your browser.

SELECT A CATAGORY & CLICK TO OPEN ANSWERS

VIDEO INSTRUCTIONS
How do I install GrovTec locking swivels? (Video Instructions)


How do I install GrovTec sling? (Video Instructions)

DOWNLOAD THESE INSRUCTIONS


How do I install GrovTec barrel bands? (Video Instructions)


Do I need to use glue or anything when I install a push button base? (Installation Video)

The use of a light coat of two-part epoxy on the threads is optional, but recommended. Here is a helpful link for installing push button swivel bases: Push Button Swivel Base Installation


How do I install M-LOK? (Video Instructions)


ABOUT US, CONTACT US, & ORDER QUESTIONS
Are all your products made in America?
  • Yes! All of our products are made right here in our Wood Village, Oregon facility.

  • Are you folks a division of Uncle Mike’s?
  • No. GrovTec US, Inc. began business in May, 2006 after acquiring machinery from a company that ceased domestic swivel manufacturing to source their products overseas. GrovTec US, Inc. is an independent, privately owned company dedicated to bringing you high quality, innovative products made right here in our Wood Village, Oregon manufacturing facility.

  • Can I order products from your web site?
  • YES! But there are many physical and on-line retailers that do carry our product line and we encourage you to support them.

  • What if my local sporting goods store doesn’t carry your products or I can’t find them through an on-line retailer?
  • Chances are that your local sporting goods store is a customer of one of our authorized distributors and they can special order the item for you. If that doesn’t work, you can still order from us online!

  • You are out of stock of what I am looking for, can you tell me when it will be back in stock or send me a notification?
  • Unfortunately, our web store does not currently have the capability to send e-mails when products come back in stock. However, we do update our inventory daily. We also recommend you please visit our online partner retailers, which can found in Find a Dealer.

  • I live in Canada. Can I order your products from your online website?
  • No. Our web site will not accept orders from outside the United States. However, you can contact our sales department at (503)557-4689 or info@grovtec.com and and we may assist you in finding a dealer. You can also use our Find a Dealer tool to find local or other online retailers who will ship to you.

  • How can I become a Grovtec dealer?
  • We sell through distributors. Chances are that if you are a dealer or a retailer, you already have an account with one of our distributors. To receive dealer pricing, please contact us to receive our list of authorized Grovtec distributors.

  • I need to have some custom parts machined. Do you manufacture OEM parts for other companies also?
  • Yes. Beginning with your custom part prints, drawings or sample for evaluation by our engineering team, we can manufacture machined parts for those who do not have their own capabilities. We produce OEM parts for many major manufacturers in the firearms industry. You can also visit our contract manufacturing website at Grovtecmachining.com.

  • I purchased a Grovtec product and it did not come with instructions. Do you not include instructions with your products?
  • All of our products come with instructions, these can be found inside the bi-fold display card. This allows us to keep a clean and minimalistic package, passing the savings onto you.

  • I sent a question through your ask a question feature on your web site and did not receive a response. Did my message not get through?
  • We usually answer all e-mail correspondences in 1 business day or less, during high volume times this may be extended to 2 days. Many times, our e-mail response may have gone into your junk/spam folder in your e-mail. If after you check this folder and it has been over this amount of time and you still have not received a response, feel free to call us at (503) 557-4689.

  • I place my order on X day and have not received my tracking number, has my order shipped yet?
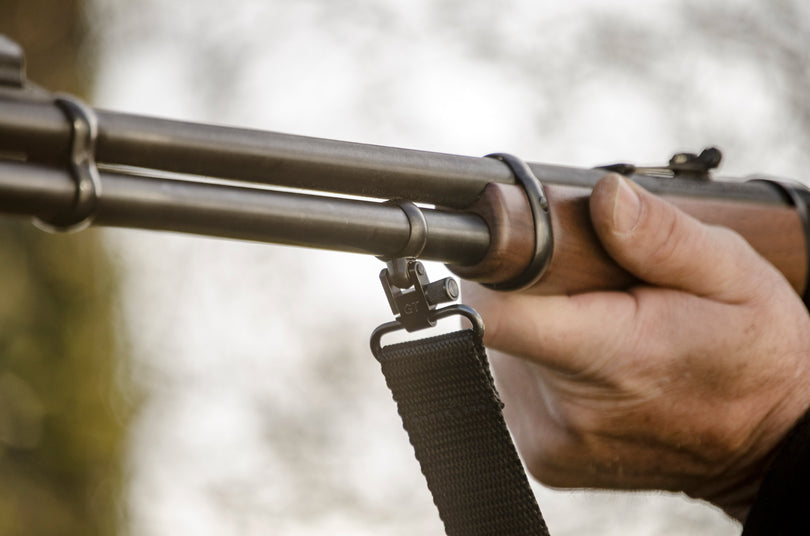
  • Our shipping policy is that we will process and ship all orders within 1-4 business days depending on capacity at the time. This does not include transit time for shipping. Many times, order confirmations and shipping notifications get automatically sent to junk or spam folders. Another way to check is if the order was placed using an account you have with us, you may view previous orders through this. If you have any additional questions about your order please contact our sales department at (503) 557-4689 or info@grovtec.com

  • BARREL BANDS
    How do I install GrovTec barrel bands? (Video Instructions)


    How do I find out which barrel band will fit my firearm?
  • Our one-piece and two-piece barrel band swivel kits are made to fit multiple applications, we sell them in many sizes in order to cover most firearms that are produced. As these products are not made for a specific firearm, and there are too many variations of firearms. We recommend you measure your mounting tube diameter and compare it to the sizes available.

  • As these products are not made for a specific firearm, and there are too many variations of firearms. We recommend you measure your mounting surface diameter and compare it to the sizes available

  • 1. One Piece Barrel Bands

    2. Two Piece Barrel Bands

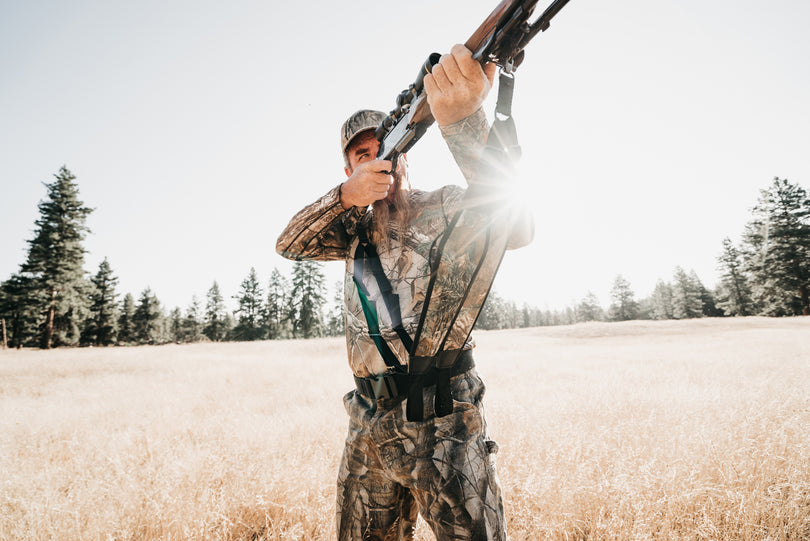
    I have an old lever-action rifle with a tubular magazine. Can I put a sling on it?
  • Yes. Please measure the mounting surface diameter and compare it to the sizes available. After selecting the correct size, you can use one of our barrel band swivel sets to mount a swivel on your magazine tube.

  • I purchased your GTSW-40 Barrel band swivel set for my .22 rifle, what is the piece of 1-1/4” x 3/8” black plastic that was included in the kit used for?
  • The plastic strip can be installed between the barrel band and the magazine tube. This piece can be used as a spacer shim to ensure a tight fit of the barrel band or as a protector to prevent any scratching on a firearm with expensive bluing.

  • Do I have to worry about a barrel band swivel set coming off the barrel or magazine tube?

    HAMMER EXTENSIONS
    My hammer extension does not fit, even though it states it will. It appears to be slightly too small.
  • This is common, our hammer extensions are made to tight tolerances on a CNC machine. Whereas hammers themselves are usually cast, which have a wide range of allowable tolerance. As you may take material off, but not put it back. And no one wants a sloppy hammer extension rolling around. Some filing may be requested for secure fitment.

  • I don’t see a hammer extension for my rifle, do you make one for it?
  • If you do not see your specific firearm listed, we unfortunately do not make a hammer extension for it. We do not recommend the use of our hammer extensions for applications not listed. Use of our hammer extension on a firearm it was not specified for, may affect the function and/or safety of it.

  • I have a new Browning BLR, how come I can’t find a hammer extension for it?
  • The new Browning BLR has a folding hammer that provides an added measure of safety which the addition of a hammer extension may interfere with. Neither Grovtec, nor Browning recommends the use of a hammer extension on the new BLR.


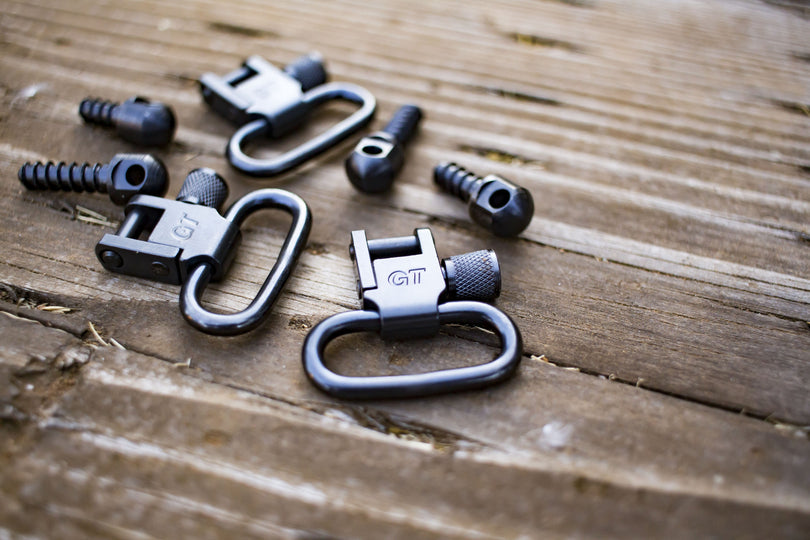
  • LOCKING SWIVELS & STUDS
    How do I install GrovTec locking swivels? (Video Instructions)


    What is the thread pitch of your machine screw swivel studs?
  • The most common thread pitch of our machine screw swivel studs is 10-32.

  • Do you make swivel studs in stainless steel?
  • No. We do however offer our swivel sets with a satin nickel finish

  • How strong are your swivels?
  • Our standard 1" locking swivels pulled tested to withhold tension up to 300 pounds and our heavy duty 1-1/4" push button swivel rated even stronger, holding over 450 pounds of tension.

  • How do I install your wood screw studs?
  • Drill a 5/32” hole slightly longer than the length of the wood screw stud you are installing (i.e. for a ½” wood screw, drill a 9/16” deep hole.). Then countersink a 7/32” hole 1/8” deep into the original hole. You will find that our GTHM-286 Sling Swivel Stud Installation Tool will make it much easier to install your swivel studs.

  • MAGAZINE CAPS / SHOTGUN SWIVEL SETS
    Does your GTSW292 – Beretta AL391/12ga fit the Beretta A391 Xtrema?
  • No, it will not. The GTSW292 will only work for the Beretta AL391 which uses a different mag cap, which is a different cap compared to a A391 Xtrema.

  • I have a 12 gauge Remington 870 Express. I see you have two types of magazine caps for Remington’s. Which magazine cap should I use and how can I tell the difference?
  • You can use either our GTSW-34 or our GTSW-296 push button magazine cap. These are designed specifically for the 870 Express. You can tell the difference by looking at the inside of the magazine cap. The cap for the 870 Express™ has internal detent slots on the inside of the cap. The magazine cap for the 870 Wingmaster™ has dimples on the lip of mag cap.

  • What is the thread pitch of your GTSW26? I have a Ithaca Model 37 and it doesn’t have a threaded hole on the barrel lug so I have to drill and tap it.
  • The thread pitch for the Ithaca barrel stud is an 8-36. Some Ithaca model 37’s production runs manufactured prior to 1983 did not have the barrel lug drilled or tapped. Most Deerslayer barrels manufactured after 1970 and standard Model 37 manufactured after 1983 were drilled and tapped on the barrel lug.

  • I have a double barreled shotgun I want to install your GTSW-30 onto. What size do I drill the holes for the screws that come with the adaptor?
  • The slotted head screws require a hole drilled and tapped for a 4-48 thread pitch.

  • I recently purchased one of your swivel sets. There were a pair of white and a pair of black washers included. What are those used for?
  • The washers are a totally optional component of our swivel sets. You may like the look of a white spacer like the older Marlin 336 with the "White Line Spacer" and classic Remington 700 BDL's, or you may prefer the subtle appearance of the black spacers to provide a smooth transition from the swivel stud to the wood stock. You may also choose not to use them at all and just have a simple wood to metal fit between the stock and the swivel stud. The washers are included to give you the option of how you want your firearm to look.

  • MOUNTING SYSTEMS (M-LOK, KEYMOD, AR)
    How do I install M-LOK? (Video Instructions)


    Keymod
  • How to install Grovtec Keymod Accessories (GTSW232 & GTSW233)

  • After verifying all firearm safety checks have been performed. Start by removing the handguard from your firearms following the Manufacturer’s instructions. Note: Grovtec’s Keymod Accessories do not slide into the keymod’s “Key slot”, but rather fastens through the circular portion of the keymod.

  • GTSW232 (Keymod Forearm Stud Adaptor) First place black stud spacer through swivel stud, followed by the bushing with the narrow side facing away from the stud. Place the threaded plate on the handguard where the stud’s threads protrude. You may apply Loctite at this point, if you desire. Tighten down fasteners with provided tool, ensuring the plates are in line with the handguard. Re-install handguard by performing removal procedures in reverse. GTSW233 (Keymod Forearm Push Button Adaptor) First place fastener through push button base, place the threaded plate on the handguard where the stud’s threads protrude. You may apply Loctite at this point, if you desire. Tighten down fasteners with provided tool, ensuring the plates are in line with the handguard. Re-install handguard by performing removal procedures in reverse

  • How to install Grovtec Keymod Rails Screw provided fasteners into back of rail by hand 1 to 2 turns, turning left to tighten. Please note threads are left handed threads. Insert rail into the keymod slots push narrow end of keymod slot. Tighten with provided wrench fasteners until rail is secure. Note that when tightening the fasteners from the outward side of the rail, turn wrench right to tighten, as threads are left handed threads.

  • Stock AR or Surface Mount
  • How to install Stock AR Picatinny Rail

  • Our Stock AR Picatinny rails were made to work with standard “oval” or “round” AR15/M4/M16 2-piece handguards. After verifying all firearm safety checks have been performed. Start by removing the lower handguard from your firearm, this can be done by pulling back on the Delta Ring, towards the receiver of the firearm, and pulling the handguard down from the receiver side. Most cases, the heat shield may need to be removed from the inside of the handguard. Place one mounting fastener through the rail, and place the bushing through the end of the fastener with the narrow side facing away from the rail. Insert mounting fastener through your handguard’s hole at the desired location. Place the threaded plate on the handguard where the fastener protrudes. Hand tighten fastener leaving some room to allow for ease of installation of remaining fastener(s). Repeat for remaining fastener(s). After the final fastener, you may apply Loctite, if you so desire at this point. Tighten down fasteners with provided tool, ensuring the plates are inline with the handguard. Re-install handguard by performing removal procedures in reverse.

  • How to install Stock AR Forearm Stud/Push Button Adaptor (GTSW266 & GTSW267) Our Stock AR Picatinny rails were made to work with standard “oval” or “round” AR15/M4/M16 2-piece handguards. After verifying all firearm safety checks have been performed. Start by removing the lower handguard from your firearm, this can be done by pulling back on the Delta Ring, towards the receiver of the firearm, and pulling the handguard down from the receiver side. Most cases, the heat shield may need to be removed from the inside of the handguard.

  • GTSW266 (AR Stock Forearm Stud Adaptor) First place black stud spacer through swivel stud, followed by the bushing with the narrow side facing away from the stud. Place the threaded plate on the handguard where the stud’s threads protrude. You may apply Loctite at this point, if you desire. Tighten down fasteners with provided tool, ensuring the plates are in line with the handguard. Re-install handguard by performing removal procedures in reverse.

  • GTSW267 (AR Stock Forearm Push Button Adaptor) First place fastener through push button base, place the threaded plate on the handguard where the stud’s threads protrude. You may apply Loctite at this point, if you desire. Tighten down fasteners with provided tool, ensuring the plates are in line with the handguard. Re-install handguard by performing removal procedures in reverse.

  • QD PUSH BUTTON SWIVELS & BASES
    What's the difference between all your different bases and mounting types? (Video Instructions)


    What is the thread pitch of your push button bases?
  • The thread pitch of our threaded push button bases is 9/16-18 UNF. For assistance in their installation, please refer to our Push Button Base Installation Guide.

  • Do I need to use glue or anything when I install a push button base? (Intall Video)

    The use of a light coat of two-part epoxy on the threads is optional, but recommended. Here is a helpful link for installing push button swivel bases: Push Button Swivel Base Installation


    Is there an easy way to install your threaded push button bases?
  • Yes, You will need:

    1. 1/2” Brad Point or Forstner drill bit
    2. 9/16-18 Bottom tap
    3. Small strip of painter’s tape
    4. 1/4” ratchet
    5. GTHM262 Push Button Base Installation Tool.

  • Take the painter’s tape and wrap it around the drill bit where the drill bit would penetrate to a depth of 1/2”. That way, you know when to stop drilling.

  • Secure the stock in a clamp or vise and drill a hole 1/2”, stopping where you marked the drill bit with the painter’s tape.

  • Using the bottom tap, thread the hole you just drilled. Don’t try and tap it all at once. Thread the tap in a turn or two and back it out a bit, then thread it in a little further until the tap is all the way in the hole.

  • Lightly coat the threads with a two part epoxy.

  • Insert our GTHM262 into the base and using a ratchet, screw the base into the stock until the mouth of the base is slightly above the level of the stock.

  • Wipe away any excess epoxy.

  • Are there any tools that will help me install a threaded push button base?
  • Yes. Our GTHM262 Push Button Base Installation Tool has a hex body that fit into the broach in the bottom of the base. This also allows you to use a 1/4” ratchet to screw the base into the stock. The tool has a shoulder that presses against the mouth of the base so you can apply downward pressure when installing the base.

  • Does your GTSW-299 Multi Adaptor stud fit in normal flush cups?
  • Yes. The multi-adaptor is designed to fill all standard flush cups (Also known as push button swivel bases).

  • How strong are your push button swivels?
  • A recent test of our heavy duty 1-1/4" push button swivel pulled tested to withholding over 584 pounds of tension.

  • What are the dimensions of your Heavy Duty Push Button Bases (Flush Cups)?
  • GTHM234
  • OD: 0.50”
  • Height: 0.50”

  • GTHM279/GTHM289/GTHM290
  • OD: 0.5625”
  • Height: 0.50”
  • Thread: 9/16-18 UNF-2A

  • SLINGS
    How do I install GrovTec sling? (Video Instructions)

    DOWNLOAD THESE INSRUCTIONS


    Your Sentinel sling does not have enough adjustment to fit me, is it defective?
  • The sentinel sling has a rough maximum length of 56”, the variation is due to our QS feature. This is a very common question, as for packaging reasons, we adjust the sling to a shorter length. To get the most length out of your Sentinel sling, you will need to adjust the tri-glide through the elastic webbing on the pad. This can be done by lifting the elastic that runs across the pad and slide the tri-glide through the elastic band to achieve your desired length. You may also gain a few inches by adjusting the tri-glide that retains the push button swivel on the end closest to the pad.
  • Main menu

    • HOME
    • OUR STORY
    • PRODUCTS
    • FAQ
    • CONTACT US

    Contact

    • Contact Us
    • Phone: 503-557-4689
    • E-mail: Info@grovtec.com
    • NOT A RETAIL STORE ADDRESS
    • Hours: Monday - Friday 7am - 3:30pm PST
    • 23555 NE Halsey St. Wood Village, OR 97060

    Support

    • FAQ
    • Customer Reviews
    • About Us
    • Downloads
    • Career Opportunities
    • Terms of Service
    • Refund policy

    Legal

    • Accessibility
    • Shipping, Warranty & Returns
    • Legal & Privacy Statements
    • Prop 65
    • Conflict Mineral Statement
    • Terms & Conditions
    • Do not sell my personal information
    • TSCA PFAS
    GrovTec Powered by Shopify

    Cookie policy

    I agree to the processing of my data in accordance with the conditions set out in the policy of Privacy.